Implementing Swipe To Delete in React Native

Dear friends, this post is about a fundamental functionality you can see in nearly every app – swipe to delete.
Searching on the internet gives you dozens of links describing how to do it, referencing some existing NPM packages. Still, many of them are too heavy, requiring many dependencies for such a simple thing, overcomplicated, not well maintained, or a mixture of those things.
This example illustrates a straightforward approach of implementing swipe to delete functionality with not many dependencies providing a good balance between easiness to implement and the number of dependencies.
Are you interested in trying the code? Here you go.
The only dependency we will need is react-native-gesture-handler, which is being used nearly everywhere in the projects if you deal with react native.
The good news is that react-native-gesture-handler already provides
It could look like this
<Swipeable renderRightActions={renderRightActions}> <View style={styles.row}> <Text>{row.title}Text> View> Swipeable>
renderRightActions is the method to render the content that appears if you swipe from the right to the left. It accepts two arguments progress:
- progressAnimatedValue: Animated.AnimatedInterpolation,
- dragAnimatedValue: Animated.AnimatedInterpolation – giving us enough data to display all necessary animations.
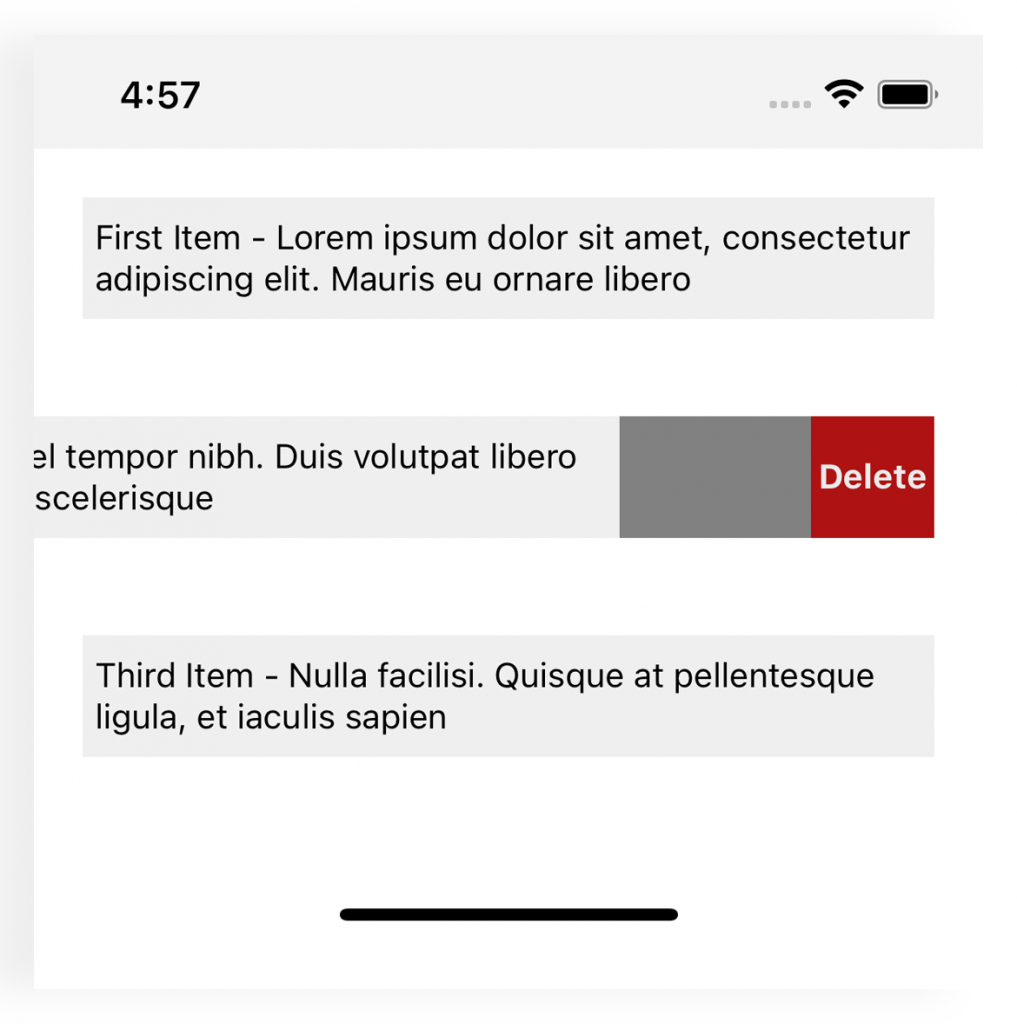
We want to implement a row with a “delete” button that fades in when we swipe to the left. The code would look like this:
const renderRightActions = ( progress: Animated.AnimatedInterpolation, dragAnimatedValue: Animated.AnimatedInterpolation, ) => { const opacity = dragAnimatedValue.interpolate({ inputRange: [-150, 0], outputRange: [1, 0], extrapolate: 'clamp', }); return ( <View style={styles.swipedRow}> <View style={styles.swipedConfirmationContainer}> <Text style={styles.deleteConfirmationText}>Are you sure?Text> View> <Animated.View style={[styles.deleteButton, {opacity}]}> <TouchableOpacity> <Text style={styles.deleteButtonText}>DeleteText> TouchableOpacity> Animated.View> View> ); };The button’s opacity becomes visible the more we drag a row to the left, nearing the value dragAnimatedValue to -150. From that point is the opacity equals 1, meaning 100% visible.
See all pieces FlatList and Swipeable together on Github here.
I hope this helps you to create something exciting.
Take care, Ievgen
Frequently Asked Questions
How do you implement swipe-to-delete in React Native?
Implement swipe-to-delete in React Native using the built-in Swipeable component from react-native-gesture-handler. Wrap your row view in <Swipeable> and pass a renderRightActions prop that renders the content revealed when the user swipes from right to left, such as a delete button. This avoids pulling in heavy third-party packages.
What dependency do you need for swipe-to-delete in React Native?
The only dependency required is react-native-gesture-handler, which is already used in most React Native projects. It ships with a Swipeable component, so you only implement the view that sits behind the swipeable row rather than adding multiple extra packages.
What is the renderRightActions prop in React Native's Swipeable?
renderRightActions is a prop on react-native-gesture-handler's Swipeable component that renders the content shown when a row is swiped from right to left. It receives two arguments, progressAnimatedValue and dragAnimatedValue, both of type Animated.AnimatedInterpolation, which provide the data needed to drive animations.
How do you fade in a delete button while swiping in React Native?
Fade in a delete button by calling interpolate on the dragAnimatedValue passed to renderRightActions. Map an inputRange of [-150, 0] to an outputRange of [1, 0] with extrapolate set to 'clamp', then apply the result as the opacity of an Animated.View. The button reaches full opacity as the row is dragged toward -150.